 Speed up parts sales with fewer keystrokes
If you enter a Y in the “Use Enhanced Counter Parts Sales Workflow” field in the System Setup screen and either enter a part number in the “Part Number” field of this screen or click on a part number within an active invoice, a pop up screen will open at the bottom of the screen in place of the existing invoice information area. This pop up screen will reduce the keystrokes necessary for entering parts in the invoice and will shorten counter parts point-of-sale transactions. Once enabled, the screen will pop up whether the user is manually entering a part number or using a barcode scanner to enter the part number.
Use the service daily DOC to know where you stand
The Daily Operating Control screen allows the service manager to view the service and body shop daily DOC. The DOC will show the service manager where the service department stands with respect to the general ledger figures on each day the DOC is compiled. The DOC must be compiled in the Accounting module before you can view the DOC in the Service module.
The DOC is located under the “Reports & Updates” button on the service main menu.
Create parts kits for more efficiency
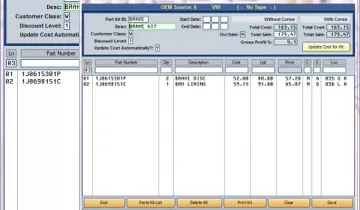
Create pre-built parts kits for specific services, control the pricing for each kit you create, and set a timeframe for a kit’s usage. The parts kits you create are available throughout the Parts Inventory module. You can pull parts kits directly to counter slips and repair orders from the Counter Sales and Service Sales screens, or you can pull parts kits to the Parts Queries screen and from there, “dump” the list to a counter slip, repair order, quote, or order queue.
You can create multiple parts kits for the same service but set different pricing for each pay type as needed. At the time of sale, you would simply pull the corresponding pay-type kit to the document. This feature is especially useful for customer pay vs. internal sales.
The Setup screen is located in Special Inventories on the main Parts Menu.
Get parts pricing and stocking information quickly with parts queries
The Parts Queries screen provides quick access to parts pricing and stocking information from inventory and the master price tape. On this screen you can:
- Create nine temporary lists. The parts numbers entered on these lists will be saved for this client station until cleared.
- Save the temporary lists to create pre-built parts kits that can be recalled as needed on this screen.*
- Create customer quotes and view the order queue.
- Dump a parts list to a counter slip, repair order, or order queue.
- Pull the parts kits on the Parts Queries screen to view parts pricing and stocking information for all of the parts on the list.
The F1 on the query screen will link you to the parts queries documentation to be reviewed.
*While you can create and save parts kits on the Parts Queries screen, we suggest adding them to special inventories before you use parts queries so they are already in the system. Taking the time to create parts kits in Special Inventories saves you time when you are working on the Parts Queries screen.
Save time by using Service Menu Operation Codes
Wouldn’t it be great to save time and not have to manually enter repair information and bill parts on commonly sold services? With Autosoft FLEX DMS and Service Menu Operation Codes, you no longer have to! Service Menu Operation Codes allow you to store all necessary information on your most popular services (e.g., Oil Changes) and add them to appointments, quotes, and repair orders by simply selecting the code. You don’t need to manually add the information.
How to create the codes:
- Use the Enter Service Menu Operations screen to create menu items
- Go to: Service > System Setup > Enter Service Menu Operations
- Create/Edit/Delete menu items
- Designate the code (up to 5 alpha and numeric characters) that will be used to select the menu item (e.g., “LOF” for an oil change)
- Enter the text that will be displayed for the menu item
- Designate menu item parameters, including:
- Labor time and rate
- Shop supplies preferences
- Special labor pricing and discounts
- Tax and G/L information
- Labor operation, complaint code, and trouble code designation (if necessary)
- Add Parts information
- Add up to 18 different parts numbers (and quantities) to accompany the menu item
- Update parts pricing information from the price tape
- Set parameter to send ERO Parts request at time of dispatch
- Customer Presentation
- Set text for the Customer Presentation
- To print this text on the repair order hard copy, enter a menu item on the Service History window while entering conditions in the repair order
For more information, reference the F1 Help screen in the Enter Service Menu Operations screen.
Contact us if you have questions on any of these tips. Call 800.473.4630
Author

Bryce Veon
About Bryce VeonSHARE


Explore more resources
Maximize Efficiency & Customer Satisfaction in Your Dealership
This article aims to provide you with the knowledge necessary to optimize your dealership’s performance and ensure delighted customers every…
Disasters Happen: Is Your Automotive Business Ready?
Disaster-proof your dealership’s data and make recovery from damaged, infected, or stolen computer equipment easier with Autosoft’s Cloud Backup and…
J.D. Power Webinar: Local Market Intelligence You’ll Use
With a retail marketplace that is constantly in flux, how confident are you in your current local market intelligence?
Stay up to date
Subscribe to get the latest auto industry insights from Autosoft experts